Cloudspace DNS
The Domain Name System or DNS translates human-readable domain names (for example, portal.afriqloud.com) to machine-readable IP addresses. The DNS functionality on Gigify Uganda Limited portal allows you to automatically create DNS records for your resources. Gigify Uganda Limited portal can use a subdomain of its primary domain.
Looking for a different kind of DNS?
The portal manages DNS at more than one level, configured in different places:
- This page — records for the resources inside a cloudspace, published under the cloudspace's own subdomain. Found on the cloudspace's DNS tab.
- Customer DNS — the top-level domains your organisation owns, and the records under them. Found at Admin → DNS.
- Operator DNS — the platform's own top-level domain, which the levels above build on. Operators only, at Cloud admin → Settings → DNS.
For example, if the portal's primary domain is portal.afriqloud.com, this means subdomains under resource portal.afriqloud.com can be resolved without providing domain ownership.
How does DNS work?
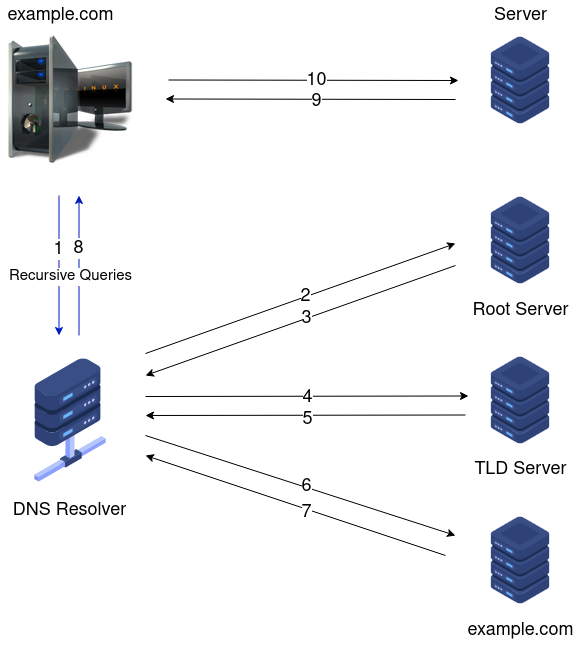
- A user searches for
portal.afriqloud.comin a web browser and the query travels into the Internet and is received by a DNS recursive resolver. - The resolver queries a DNS root nameserver.
- The root server responds to the resolver with the address of a Top Level Domain (TLD) DNS server (such as .com or .net), which stores the information for its domains. When searching for
portal.afriqloud.com, our request is pointed towards the .com TLD. - The resolver requests the .com TLD.
- The TLD server responds with the IP address of the domain's nameserver,
portal.afriqloud.com. - The recursive resolver sends a query to the domain's nameserver.
- The IP address for
portal.afriqloud.comis returned to the resolver from the nameserver. - The DNS resolver responds to the web browser with the domain's IP address initially requested.
- The browser makes an HTTP request to the IP address.
- The server at that IP returns the webpage to be rendered in the browser.
Configure DNS
By default, customers will get a subdomain of the Gigify Uganda Limited top-level domain generated from their IDs.
For Example:
Let's take a customer with ID customer-1 and the Gigify Uganda Limited top-level domain res.portal.afriqloud.com. Then the auto-generated customer top-level domain will be customer-1.res.portal.afriqloud.com.
Customer admins can configure specific top-level domains on Admin > DNS > TOP LEVEL DOMAINS page. Additionally, they can edit the customer's top-level part (e.g. customer-1) as long as the new top-level part is not used by another customer.
Also, they can configure DNS records on Admin > DNS > DNS RECORDS page and they are allowed to add/delete DNS records to their top-level domains or subdomains of these domains.
New top-level domain
To add a new top-level domain, go to Admin > DNS > TOP LEVEL DOMAINS page, then click ADD TOP LEVEL DOMAIN.
- Enter your new top-level domain.
- The Validate domain ownership step shows numbered instructions: set up the record at your domain registrar (log into your account and find the DNS records section), add a TXT record with the value
cloudbuilders-domain-verification=<token>shown in the wizard (TTL 3600), then click Verify domain. - Click VERIFY to verify your domain, then click CONTINUE. BACK returns to the previous step. The domain is not stored until it has been verified.
Note: The change may take up to 72 hours to propagate across your servers.
- Validate your NS, go to your domain registrar, log into your account and find the DNS records section.
- Follow the instructions to add the displayed NS records in your DNS configuration.
- Click Verify to verify your domain, then click Submit.
Edit top level domains
To edit the top level domain, go to Admin > DNS > TOP LEVEL DOMAINS page, then click icon. Enter your new top level domain and click SUBMIT
New DNS record
To add a new DNS record, go to Admin > DNS > DNS RECORDS and click ADD DNS RECORD.
- Select the Record type (e.g. A, AAAA, MX...etc.).
- Enter your subdomain and choose the top-level domain for this subdomain.
- Fill in the required fields based on the chosen record type.
- After filling in the required fields, click Submit.
Tip
Currently, the DNS records supported types are: A, AAAA, MX, TXT, CNAME, NS, SRV and CAA.
When you configure a new DNS record, each record type will require different fields.
| Record Type | Required Fields |
|---|---|
| A | IP address |
| AAAA | IP address |
| NS | Value |
| CNAME | Value |
| TXT | Value |
| MX | Priority and value |
| SRV | Value, protocol, service, priority, port and weight |
| CAA | Flag, tag (issue, issuewild or iodef) and domain |
Delete DNS record
To delete a DNS record, go to Admin > DNS > DNS RECORDS page, then click icon for the DNS you want to delete. Alternatively, select the DNS record using the checkbox and click DELETE SELECTED DNS RECORDS in the top bar.
Resources DNS
Cloudspace DNS
In the public cloudspace creation wizard, you will find an optional field that allows you to set a subdomain. This subdomain, if specified, will point to an external IP address of this cloudspace using A record.
For public and nested cloudspaces, you can find a DNS tab that contains all the DNS records related to this cloudspace. You can add a new DNS record to your cloudspace following these steps:
- Open your cloudspace details page.
- Click the DNS tab in the middle of the page.
- Click ADD DNS RECORD in the top bar.
- Configure the DNS record: select the Record type, enter the Subdomain (optional), choose from the Available top level domains and fill in the required fields based on each record type. The TOP LEVEL DOMAIN button on the form lets you manage top level domains.
- Click SUBMIT (or CANCEL to back out).
To delete the DNS record on your cloudspace, click icon for the DNS record you want to delete. Alternatively, select the DNS record using the checkbox and click DELETE SELECTED DNS RECORDS in the top bar.
Tip
When adding an A or AAAA DNS record, the IP address is optional: if you leave it empty, the record points to the cloudspace's external IP. A record shows as <subdomain>.<domain assigned by your operator>.
Deleting a record opens the Delete DNS records dialog ("Please confirm deleting selected DNS records").
External network DNS
When attaching a VM to an external network, an optional domain can be added that will point to the IP address of this external network using an A record.
To attach your VM to an external network, follow the following steps:
- Open your VM details page.
- Click NETWORK INTERFACES tab in the middle of the page.
- Click ATTACH NIC in the top bar.
- Choose whether to attach to an External networks or a Cloudspace as network, then select the specific network or cloudspace from the resulting list.
- Select an IP address from that network.
- Select the model of NIC.
- Optionally configure a DNS record. When attaching a NIC, the domain record type is limited to A or AAAA, each with a subdomain and top level domain. (The full set of 8 record types — A, AAAA, MX, TXT, CNAME, NS, SRV, and CAA — is available on the cloudspace's DNS tab and when adding a domain to an existing NIC.)
- Click ATTACH.
External networks now have a new table of DNS records that will contain all DNS records related to this network interface. Also, you can add DNS records related to this network interface.
Public available objectspaces
When creating an objectspace now, there is an option to make this objectspace publicly available.
- In the navigation menu, go to Objectspaces page.
- Click CREATE OBJECTSPACE in the top bar.
- Select the location, then click NEXT >>>.
-
Enter your objectspace name, and select the cloudspace that your objectspace will be connected to.
Tip
You can choose whether to deploy this objectspace to an existing cloudspace or a new cloudspace. A domain from your cloud top level domains with an optional host (subdomain) should be added.
Tip
When choosing to deploy it using a new cloudspace, an optional subnet can be added.
-
Check the Make publicly available box, then click NEXT >>>.
-
Configure your DNS, enter your DNS subdomain, top-level domain. Feel free to enable Letsencrypt or not.
Tip
All public objectspaces are served over HTTPS protocol, so you should choose whether to deploy it using Letsencrypt or to add a certificate for the chosen domain from the Certificate Store page (Admin > Certificate Store).
-
Click CREATE OBJECTSPACE.
Tip
You won't be able to create your objectspace if your domain doesn't have a certificate. So keep in mind to upload the domain certificate before creating the objectspace.